Oddball project here, I am German Shepard guy but I got buddies heavily into pit bulls, and they encouraged me to try something pitbull related, and this is the result.
Did this with a diamond drag bit & 1/4" plexi, didn't appreciate the fine detail in this until I saw it in high res, looks nice.
3d mesh pitbull edge lit sign
-
ccm
- Posts: 32
- Joined: Sat Dec 31, 2011 5:59 pm
- Model of CNC Machine: CastCNC
- Location: Bakersfield, CA
- Contact:
Re: 3d mesh pitbull edge lit sign
Really good detail using the drag bit. Was this just one pass with the bit or multiple? What are you using for a light source? Did you buy or build something and can you show that? Looks very even and bright. Great job!
Chris...
Chris...
-
Xxray

- Vectric Wizard
- Posts: 2304
- Joined: Thu Feb 17, 2011 8:47 am
- Model of CNC Machine: CAMaster Stinger 1
- Location: MI USA
Re: 3d mesh pitbull edge lit sign
1 pass, this one took over an hour, alot of lifting of the Z. You would think it would go more or less in a long interconnected line, but it would do a square, lift, another square, lift ,,, So all of that lifting added up. Still not bad time wise, I know alot of guys think nothing of 5=6 hours for a small litho.
Base is custom made, pictured below is my standard design, which can be easily adjusted to accommodate different sizes. Made out of mdf, I use a 1 piece base for 1/2" plexi, 1/4" requires 2 because the led strip is wider than the plexi. For the top part, I leave little tabs at both ends of the slot so the plexi doesn't slide through. I used a multi color strip, which requires a remote & flashing unit, they can be found pretty cheap on ebay.
Base is custom made, pictured below is my standard design, which can be easily adjusted to accommodate different sizes. Made out of mdf, I use a 1 piece base for 1/2" plexi, 1/4" requires 2 because the led strip is wider than the plexi. For the top part, I leave little tabs at both ends of the slot so the plexi doesn't slide through. I used a multi color strip, which requires a remote & flashing unit, they can be found pretty cheap on ebay.
- Attachments
-
Doug
-
Xxray
- Vectric Wizard
- Posts: 2304
- Joined: Thu Feb 17, 2011 8:47 am
- Model of CNC Machine: CAMaster Stinger 1
- Location: MI USA
Re: 3d mesh pitbull edge lit sign
A couple more mesh style I did today, not quite as impressive as the pit, but nice in their own right.
- Attachments
-
-
Doug
Re: 3d mesh pitbull edge lit sign
Amazing work. Very good idea for making 2d look like 3D wireframe.
-
Xxray
- Vectric Wizard
- Posts: 2304
- Joined: Thu Feb 17, 2011 8:47 am
- Model of CNC Machine: CAMaster Stinger 1
- Location: MI USA
Re: 3d mesh pitbull edge lit sign
Thanks Khalid.
These are interesting and fun to do, glad I tried the pit bull.
Really something how small variations in line angles and shape can trick the eye into distance and curve perspectives.
These are interesting and fun to do, glad I tried the pit bull.
Really something how small variations in line angles and shape can trick the eye into distance and curve perspectives.
Doug
-
ccm
- Posts: 32
- Joined: Sat Dec 31, 2011 5:59 pm
- Model of CNC Machine: CastCNC
- Location: Bakersfield, CA
- Contact:
Re: 3d mesh pitbull edge lit sign
Xxray wrote:1 pass, this one took over an hour, alot of lifting of the Z. You would think it would go more or less in a long interconnected line, but it would do a square, lift, another square, lift ,,, So all of that lifting added up. Still not bad time wise, I know alot of guys think nothing of 5=6 hours for a small litho.
Base is custom made, pictured below is my standard design, which can be easily adjusted to accommodate different sizes. Made out of mdf, I use a 1 piece base for 1/2" plexi, 1/4" requires 2 because the led strip is wider than the plexi. For the top part, I leave little tabs at both ends of the slot so the plexi doesn't slide through. I used a multi color strip, which requires a remote & flashing unit, they can be found pretty cheap on ebay.
Thanks for the info... so there's not really a way to get away from the external transformer is there? Something super compact that would tuck into the base somewhere?
-
jdonaldson
- Vectric Apprentice
- Posts: 68
- Joined: Tue Mar 02, 2010 10:46 pm
- Model of CNC Machine: Camaster Stinger Epilog Aspire
- Location: Austin TX
Re: 3d mesh pitbull edge lit sign
As always very nice work, I'm sure you've answered this before but is there a prefered thickness and how do you prepare the endge for the lighting
Thanks
John
Thanks
John
-
Xxray
- Vectric Wizard
- Posts: 2304
- Joined: Thu Feb 17, 2011 8:47 am
- Model of CNC Machine: CAMaster Stinger 1
- Location: MI USA
Re: 3d mesh pitbull edge lit sign
Chris, I believe the LED strips themselves can easily be powered by batteries if desired. These wall warts produce 12v @ 1-2 amps, so you'd need something in that range. Routing out a recess for batt would also be very doable if you felt like putting the effort in, and of course, a switch. The flasher controller, which lets you pick multiple flashing patterns or dozens of single colors, adjust light intensity, tempo and also turns the unit on and off, thats a different matter and I don't know if they could be battery powered or not. So, doing a single color that does not need a controller would be relatively easy, using a multi color strip with controller, don't know about that.
John, I often tend to work with what I have. I ran into a source for loads of free 1/2" plexi at a job so I was using mostly that for quite a while, I also bought a 1/4" sheet to give me more options. I ran down my stock of 1/2", I am now going to try 3/8".
I really have no preference, they cut just the same, the thicker pieces do add a bit of a look of depth. Customers, from what I have seen, don't have a real preference either.
I sometimes like the look and extra heft of the thicker stuff, sometimes the lightness of the thinner is better. I am actually doing a cake topper, for example, for a soon to be married couple, and they needed it light as possible for obvious reasons. On the other hand, I do alot of designs for a mc club, they tend to like it thicker & heavier. I think 3/8" will be a nice compromise between the two ,,, And price may also be a consideration, thicker = more expensive.
Far as the edges, I rough them up with an orbital sander using medium grit paper, then use a mouse sander with fine grit. I blow them off, flame polish, and that produces a nice uniform, attractive edge. I could buff to make them transparent, but I like to leave them a little cloudy looking. Bottom edge stays fresh, no need to do it since its hidden, and probably passes light a little better without being sanded.
Doug
-
hdtheater
- Vectric Craftsman
- Posts: 183
- Joined: Tue Apr 27, 2010 11:00 pm
- Model of CNC Machine: CNC RouterParts Pro 48x96
- Location: DFW Texas
Re: 3d mesh pitbull edge lit sign
Is this just standard plexi you can get at Lowes or HD. This is something I have been meaning to try and wanted to experiment on the cheap.
-Eric
-Eric
Thanks,
-Eric
-Eric
-
Xxray
- Vectric Wizard
- Posts: 2304
- Joined: Thu Feb 17, 2011 8:47 am
- Model of CNC Machine: CAMaster Stinger 1
- Location: MI USA
Re: 3d mesh pitbull edge lit sign
You can get plexi from the home improvement stores, but not on the cheap, you'll pay top $$, and are limited to 1/4" or less thick and pre cut pieces.
Best bet is to look around for a local acrylic supplier, or try these guys http://www.estreetplastics.com/Plexigla ... r_s/21.htm
Even with shipping they are much cheaper than lowes, and offer a far greater selection. My acrylic supplier is about 20 miles away, but he makes free deliveries.
Craigslist might be an option for dirt cheap plexi, but it is almost always used, and the scratches make it almost unusable in most cases for edge lit signs, unless you are just looking to practice dirt cheap.
Doug
-
hdtheater
- Vectric Craftsman
- Posts: 183
- Joined: Tue Apr 27, 2010 11:00 pm
- Model of CNC Machine: CNC RouterParts Pro 48x96
- Location: DFW Texas
Re: 3d mesh pitbull edge lit sign
Thanks for the info. I will start pricing around. My local plastics is about 35 miles and all metro in Dallas.Xxray wrote:You can get plexi from the home improvement stores, but not on the cheap, you'll pay top $$, and are limited to 1/4" or less thick and pre cut pieces.
Best bet is to look around for a local acrylic supplier, or try these guys http://www.estreetplastics.com/Plexigla ... r_s/21.htm
Even with shipping they are much cheaper than lowes, and offer a far greater selection. My acrylic supplier is about 20 miles away, but he makes free deliveries.
Craigslist might be an option for dirt cheap plexi, but it is almost always used, and the scratches make it almost unusable in most cases for edge lit signs, unless you are just looking to practice dirt cheap.
Thanks again
-Eric
Thanks,
-Eric
-Eric
-
Xxray
- Vectric Wizard
- Posts: 2304
- Joined: Thu Feb 17, 2011 8:47 am
- Model of CNC Machine: CAMaster Stinger 1
- Location: MI USA
Re: 3d mesh pitbull edge lit sign
I'm on a roll, this is the last one I'll post.
A nicely detailed ball, looks pretty wild.
A nicely detailed ball, looks pretty wild.
- Attachments
-
Doug
-
usLEDsupply
- Vectric Apprentice
- Posts: 86
- Joined: Tue Jan 29, 2013 4:28 am
- Model of CNC Machine: Digital Tool CNC Router + Speedy 400 120
- Location: Mercer, PA
- Contact:
Re: 3d mesh pitbull edge lit sign
I Like the Pitbull one and may have to try doing a robot once i get some acrylic
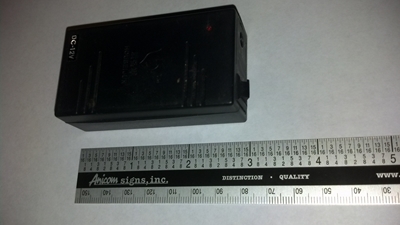
You can power the strips and controllers of a 12v battery. Here is a picture of a small rechargeable battery pack we use for shows and demos but you could also use emergency light batteries or something similar
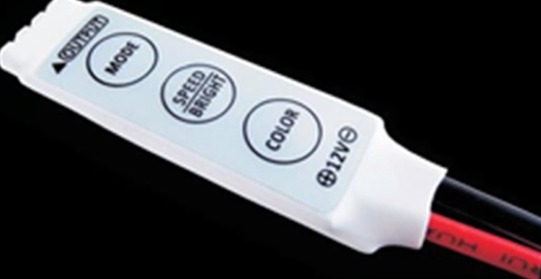
as for the controller you can run any of them on a battery but you will need to keep it pretty close to 12v for it to work and if space is a concern you may want to try these super small ones not much wider than the strips but still have several programs built in (there is also a slightly larger one that uses a remote like in your other picture)
You can power the strips and controllers of a 12v battery. Here is a picture of a small rechargeable battery pack we use for shows and demos but you could also use emergency light batteries or something similar
as for the controller you can run any of them on a battery but you will need to keep it pretty close to 12v for it to work and if space is a concern you may want to try these super small ones not much wider than the strips but still have several programs built in (there is also a slightly larger one that uses a remote like in your other picture)
-
Xxray
- Vectric Wizard
- Posts: 2304
- Joined: Thu Feb 17, 2011 8:47 am
- Model of CNC Machine: CAMaster Stinger 1
- Location: MI USA
Re: 3d mesh pitbull edge lit sign
I'd like to try one of those mini controllers ,, Do they solder right to the strip, and is there an on/off built into the mode button ?
Doug