
Jay,
The corian is 2 pieces 18" wide and 36" long fabricated to make a 36" X 36" table. Unless it is special ordered, Corian only comes in 30" wide sheets, so I had it fabricated. The top is FLAT. I mean + or - .002" everywhere except for a .006" dip two inches wide in the middle. Couldn't figure out why the dip was there for awhile until it dawned on me that that is where the seam is between the 2 pieces, and thats where they were buffed smooth after being glued together. Still, everything I do will be bigger than 2 inches, and if its smaller I'll just put it anywhere except for the middle. The top is bolted along the sides with a MDF backing. I didn't glue the MDF to the Corian, its just sandwiched btween the corian and the side beams. The reason I have the MDF is beacause the corian is only 1/2" thick and I didn't want the table to sag or vibrate when working on it. I designed it myself, but I can't take credit for it as I looked at MANY pictures on the zone to get my ideas. I just took the things I liked from each machine, and combined them to make mine.
Jason
Gallery Of Machines
-
bbergami
- Posts: 44
- Joined: Tue Dec 27, 2005 2:43 am
- Model of CNC Machine: DIY
- Location: Bedford, Texas
I built my first machine about 1 1/2 years ago. It has an all aluminum plate frame with a fixed gantry. 680 oz steppers on x & y, 5/8" ballscrews, Gecko G201's and a DeskCnc controller. It can cut about 18"X24".
Since everything I wanted to do was always just a little bigger than my first machine would handle, I made my second machine with 2 meter rails on x and 1 meter on y. I can cut about 33" x 67" It has a steel frame with a moving aluminum plate box gantry. Dual 1" ballscrews on x, 5/8" on y & z, 1225 Oz peak servos, Gecko 320's and a deskcnc controller.
Bert
- Attachments
-
 first-machine.jpg
- (193.22 KiB) Downloaded 1891 times
-
- cnc-010.jpg
- (77.14 KiB) Downloaded 1961 times
-
- cnc-009.jpg
- (80.64 KiB) Downloaded 2739 times
-
dighsx

- Vectric Wizard
- Posts: 939
- Joined: Tue Nov 01, 2005 12:36 am
- Location: Royal Oak, Michigan USA
- Contact:
How do you guys with dust collection skirts line up you router for cutting? I've though about setting up dust collection but I can never figure out how you can see the bit to line things up.
Take it easy.
Jay (www.cncjay.com)
Jay (www.cncjay.com)
-
RoutnAbout

- Vectric Wizard
- Posts: 2087
- Joined: Mon Sep 19, 2005 11:09 pm
- Model of CNC Machine: 24x18 Desktop
- Location: North Manchester, Indiana
Jay,
I made a dustskirt very simular to the one that shopbot provides, But I use the same type of door sweep (bristle length approx 1.25 inches ) that Bert has in the pics he posted. Although it works pretty good, I'm going to attempt to make a new one to gain access to the bits and collets easier.
I think I'm going to make the top plate out of .75 acrylic in the same shape as the old dustskirt, same hole locations for the dusthose and spindle hole. The big difference that I'm going to change is that it'll be made in 2 peices.
The picture below is shopbots new dustskirt ( I'm only using it to demonstrate ). The Black Lines are where the two peices are seperated. And I'll be using 4 strong earth magnets The magnets I purchased are approx 1" in diameter ( not shown in the link) and will be placed where the black circles are located. 2 on each side.
That way I can remove the front half and have complete access to the tool, collet, and pull it off and put it back on with ease.
- Attachments
-
- dustskirt.gif
- (290.48 KiB) Downloaded 1780 times
-
Rcnewcomb

- Vectric Archimage
- Posts: 5916
- Joined: Fri Nov 04, 2005 5:54 am
- Model of CNC Machine: 24x36 GCnC/WinCNC with ATC
- Location: San Jose, California, USA
- Contact:
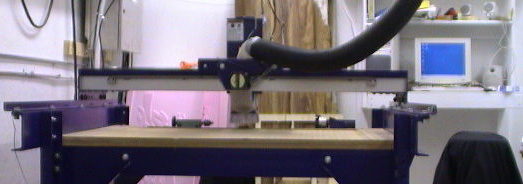
Shopbot PRT Alpha 48
The heart of 222 Artisans, LLC
Shopbot PRT Alpha 48 with indexer and a Porter Cable Router. We use laser sites to position the bit. The dust collector is not in the way of the lasers.
Shopbot PRT Alpha 48 with indexer and a Porter Cable Router. We use laser sites to position the bit. The dust collector is not in the way of the lasers.
-
dighsx
- Vectric Wizard
- Posts: 939
- Joined: Tue Nov 01, 2005 12:36 am
- Location: Royal Oak, Michigan USA
- Contact:
How does the laser bit thing work? I have something like that on my drill press but never thought about it for machine. One the drill press the length of the bit seems to throw it off a bit; do you have any problems with that in your setup?
Take it easy.
Jay (www.cncjay.com)
Jay (www.cncjay.com)
-
Rcnewcomb
- Vectric Archimage
- Posts: 5916
- Joined: Fri Nov 04, 2005 5:54 am
- Model of CNC Machine: 24x36 GCnC/WinCNC with ATC
- Location: San Jose, California, USA
- Contact:
Laser Cross-hairs
We have one laser mounted on the Y carriage on the end closest to the wall. The other laser is mounted on the Z-carriage.
http://www.strait-line.com/irwin/consum ... l_30.jhtml
We picked these up at our local hardware store for $10 each.
Setup:
With the dust collector removed we put a 30 degree bit in and zeroed on the table top. We then adjusted the lasers so they crossed at the point of the bit. There is a minor amount of parallax error as you move very near the Y-laser but, by and large, this is far faster than removing
the dust collector, setting the X-Y zero and then reconnecting the dust collector.
-
Rusty
- Vectric Craftsman
- Posts: 127
- Joined: Mon Jul 03, 2006 4:50 am
- Model of CNC Machine: Homebuilt
- Location: Calgary, Alberta, Canada
Here is my machine. It took me also about one year to build with E-Bay parts, salvaged metal, misc scrounged stuff. Fabricated myself all the parts for gearboxes, drivetrain & whatever. Did however buy a Logitrol complete system (works great). I can cut (on the table) 39 X 52 inches with 10 inches of Z travel. I can also move the head outside of the table for about 14 inches (future 4th axis). Still need to tidy up the electrical, vacuum system & build a different style of table.
X-axis is a rack & pinion, Y-axis is a chain & sprocket drive, Z-axis is a ball screw. All work great. All have almost no backlash on all axis with rapid feed at 350 IPM.
Talk to you all later.
Rusty
X-axis is a rack & pinion, Y-axis is a chain & sprocket drive, Z-axis is a ball screw. All work great. All have almost no backlash on all axis with rapid feed at 350 IPM.
Talk to you all later.
Rusty
- Attachments
-
- Router(fin3).JPG
- (688.91 KiB) Downloaded 1399 times
-
- Router(fin2).JPG
- (696.61 KiB) Downloaded 1441 times
-
- Router(fin1).JPG
- (692.36 KiB) Downloaded 2289 times
-
RoutnAbout
- Vectric Wizard
- Posts: 2087
- Joined: Mon Sep 19, 2005 11:09 pm
- Model of CNC Machine: 24x18 Desktop
- Location: North Manchester, Indiana
Hey guys,
I forgot that I had this site bookedmarked, and Jay was asking about dustskirts. I think this link might fit in and hope it will help. Seals, Brushes and Sweeps
I forgot that I had this site bookedmarked, and Jay was asking about dustskirts. I think this link might fit in and hope it will help. Seals, Brushes and Sweeps
-
Warren
- Vectric Craftsman
- Posts: 181
- Joined: Wed Nov 30, 2005 3:08 pm
- Model of CNC Machine: Router
- Location: Bordeaux, France
This is one of my three,
I feel guilty that I havn't built it myself after seeing all your own creations.
Perhaps if I get a spare year or so I will have a go.
It cuts just over 3m x 2m with a Z clearance of 175mm
Precision ballscrew drives with preloaded nuts to eliminate backlash on all axes. Auto squaring, twin screw system on gantry and X axis. Digital, ac brushless servo motors,
4Kw 5.5Hp spindle, speed 3,000-24,000 rpm.
Maximum feed rate 20m/min
Integrated and zoned vacuum bed with multiple pumps and independent switching.
Automatic tool setting and Auto tool change.
I did however design the swarf extraction system as the one supplied with the machine was next to useless!
- Attachments
-
- DSCN0874.JPG
- (665.83 KiB) Downloaded 1547 times
-
- DSCN0875.JPG
- (653.46 KiB) Downloaded 1600 times
-
- DSCN0873.JPG
- (638.8 KiB) Downloaded 2324 times
-
Warren
- Vectric Craftsman
- Posts: 181
- Joined: Wed Nov 30, 2005 3:08 pm
- Model of CNC Machine: Router
- Location: Bordeaux, France
Here are a couple of shots of it performing a tool change.
Warren.
Warren.
- Attachments
-
- DSCN0877.JPG
- (614.22 KiB) Downloaded 1398 times
-
- DSCN0876.JPG
- (606.55 KiB) Downloaded 1901 times
-
dighsx
- Vectric Wizard
- Posts: 939
- Joined: Tue Nov 01, 2005 12:36 am
- Location: Royal Oak, Michigan USA
- Contact:
Warren, why would you want to build a machine when you've got one like that? That's one hell of a machine! The automatic tool changer would be really nice to have.
Take it easy.
Jay (www.cncjay.com)
Jay (www.cncjay.com)